Hello, all! Thank you for joining us for another fun day of organizing your home.
We have been on a journey of decluttering your house and I am so excited to have another day with you!
If you want to see the other blog posts in this series, you can visit our blog here.
Today we are going to continue with YOUR spaces and organize your bathroom. Are you ready!!
This is the kind of enthusiasm we always bring to an organizing project!
The first step to organizing your bathroom is to next step is to pull everything out. That means bringing out everything from the shower, cabinets, drawers and any other spaces that are in your bathroom.
Don’t be shy, bring it all out!
By pulling all of the items out from their spots, you’ll be able to see all of the items that occupy your bathroom and start making decisions on what can stay and what needs to go.
As you pull out all of the items in your bathroom, categorize them into groups based on what they are.
Put all of the products from your shower that are currently being used in a group together (shampoo, conditioner, soap, face wash, exfoliates).
Then move to the rest of your beauty products that are currently in use and categorize those as well.
Sort everything into a broad group and then break each broad group into smaller, more specific groups.
The more specific you can get for each group, the better your bathroom will look and function at the end.
Group all of the hair products together, then sort them by hairspray, heat protector, dry shampoo, accessories and tools.
Do the same for face products, then sort them by facial cleanser, serum, toner, moisturizer, wipes, makeup remover and masks.
Move onto sorting the body products, then grouping them by deodorant, lotions, sunscreen, oils and bath bombs.
Next up, group together feminine products, then sort them by tampons, liners, pads and wipes.
After that, round up all of the oral care, sort them by toothbrush, toothpaste, floss and mouthwash. Lastly, the body sprays, sort these by scent or by how often you use that specific perfume.
Then do the same with all of your makeup. Making groups of eye products, then sort them by mascara, eyeliner and eye pallets.
Then group together all of the products for your face and sort those into powders, bronzers, blushes, highlighters and foundation.
You can get these cute little pull out organizers on Amazon!
Next sort all of your lips products, then sort them by lipsticks, glosses, liners and chap sticks. Lastly group together all of your tools eyelash curlers, tweezers, sharpeners and nail clippers.
Finish up by doing the same with your paper products, grouping them by toilet paper, cotton swabs and cotton rounds.
After that, all of the linens, sorting them by body towels, hand towels and face clothes. Don’t forget to categorize your cleaning supplies!
Finish up by grouping together your back stock items, these are items that you have extra for when your currently being used products run out. Make groups for these products just as you have for all of the other items.
By grouping together similar items, you will easily be able to see all of the items that you are still using and the items that it’s time for you to get rid of.
Once all of the items are sorted into categories, now is the time to clean your bathroom.
Scrub inside (and out!) the shower, toilet, drawers, and cabinets.
Wipe on top of the bathroom counters and mirror.
Disinfect commonly touched surfaces like the door handles and the light switches.
Put any rugs or hand towels in the washer so those can get cleaned as well.
Finish up with lighting a candle (or turning on the electric candle warmer) to spruce up the scent in the room.
Now is the best time to clean the bathroom since there are no products or items getting in the way of those hard to reach places.
After you are finished cleaning the bathroom, it’s time to get back to all of the products sitting on your bathroom floor.
All of the items need to be kept, donated, or thrown away.
Items that you want to keep in the bathroom are products that are currently being used or will be used once the current items are gone.
Items that need to be donated are items that you bought, never opened, and will not be using in the future (things such as, items you don’t like the scent of, items that you bought the wrong brand, products that were gifts but you will never use, wrong shades of makeup).
Check with your local donation center that they will accept unopened hygiene products!
Items that are trash are products that have expired and products that you have opened but won’t be using in the future.
With so many different products that are filling up your shelves, now is a great time to check expiration dates to make sure the products you are using are still safe for you.
Once you have made the decisions on the products you are keeping, let’s start putting them away.
As you’re putting all of the items back, remember to keep them in the categories that you sorted them in previously, that way they continue being easy to find. First, put your already opened shower items back into the shower.
Then, put your already opened daily routine products on your bathroom counter.
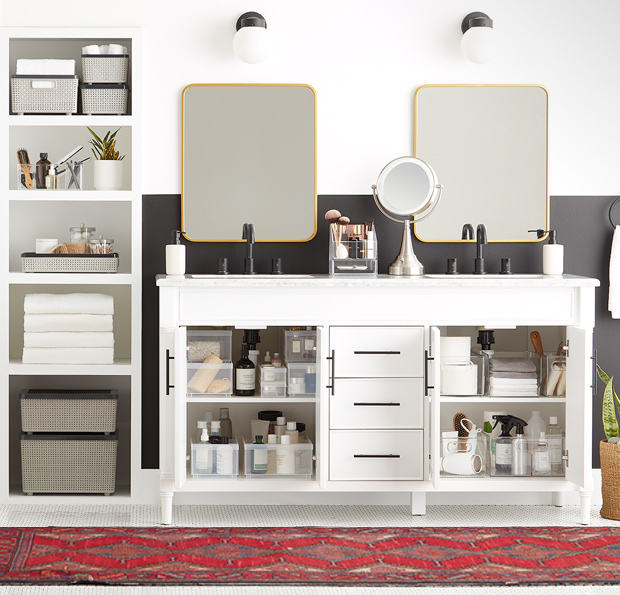
Use cute trays to contain the items so they are kept organized and stay looking neat. We always love getting these at Target. You can also use Amazon!
For items that you don’t use as often, store away in drawers. We always like these Sterilite pull out drawers. You can get them online, at Target and Walmart!
Now let’s move onto your makeup. Do you have an organizer to store your makeup in?
If yes, perfect! Put your products back based on their categories.
If no, now would be a good time to invest in one.
If you don’t have a specific spot for your makeup, it will continue to be cluttered up on your bathroom counter.
For some of us who are lucky enough to have a makeup vanity, organize this area now if you didn’t already do it yesterday when we did the Master Bedroom.
Next up, time to put away your linens.
Fold them nicely and store them in baskets.
Finish up by putting away back stock items, cleaning supplies, feminine products, and paper products in the cabinets.
Again, use and label bins to ensure all of the different items are kept in their groups and looking good.
If the space under you sink is limited, check out these expandable under the sink storage racks that are great for keeping your products organized even when they are out of site.
It may seem excessive to have a variety of baskets, bins, and organizers, but in order for all of your products to stay organized, everything needs to have a “home.”
By having homes for all of your items, you will easily be able to keep everything organized and easy to find with little effort.
Once all of your products are back in their spot, let’s finish up by dealing with all of the leftover items.
These are the things that were in your bathroom at the beginning of the process but you didn’t put away because they don’t actually belong there.
Take the time now to place them where they actually go inside your home.
Lastly, sweep and mop the floor, lay the rugs back out, hang up the hand towels, and take out the trash. Ta-da! Your bathroom is officially organized!
Just like your closet, your bathroom should be a place in your home that you go into and feel ready to relax. This is where you prepare yourself for the day and transform yourself into who you want to be.
Here are more practical tips to decluttering your bathroom!
If you don’t feel this way when you’re getting ready for the day, please reach out to the Clutterless Home Solutions Team.
Talk soon,
Clutterless Home Solutions


